SAP BASIS
SAP BASIS stands for Business Application Software Integrated Solution. It is a set of tools that will work as a bridge between your operating system, communication protocols, the various business applications and database. SAP BASIS also includes different administration activities.
These are load balancing, installation, and also maintaining the performance of the SAP systems that are being executed on SAP ABAP or Java stack. You can say that BASIS is an operating system for ABAP and SAP applications.
The BASIS administrators have the responsibility of handling the system errors. They also keep a check on the SAP enterprise and cloud applications. In this article, we will delve deeper into the details of the technology.
What is BASIS?
SAP BASIS is required for handling all the technical layers of the SAP stack. It is a system administration platform that is required for handling SAP environments such as SAP HANA. Its main aim is to smoothly execute all the SAP systems in this environment.
The different functionalities of the SAP BASIS software are mentioned below:
- Configuration and installation of SAP applications and systems
- Determining bugs, errors and tweaking the SAP systems for maximum performance
- Overseeing that the different users of the SAP systems have the correct authorization rights. They must be able to use the functions they need
- Executing and maintaining the background jobs
- Restoring the essential data and keeping backups
- It is used for configuring the SAP TMS. This is used for managing the transports between one or more SAP systems
- Installation, configuration and maintenance of devices such as printers
- It provides you with other services such as communication between databases, memory management, exchange of business data, collection of web requests and application data etc.
You can consider SAP BASIS as the backbone of your entire SAP landscape.
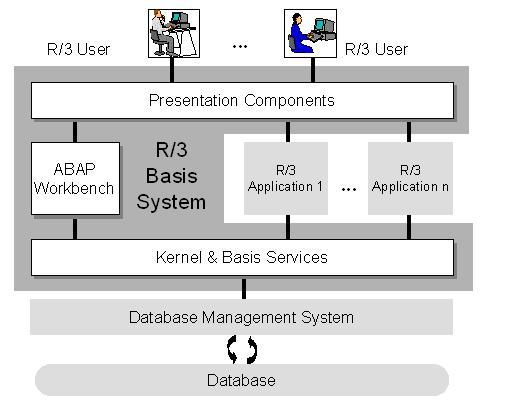
The layers of the SAP BASIS system are:
- Presentation layer
- Application layer
- Database layer
What is Basis Administration?
BASIS administration refers to all the different activities performed by an administrator. The aim is to keep the SAP environment stable.
This means analyzing the system logs and determining errors. Administration helps in preventing major system issues. For example, some business objects in a SAP system may be modified. In this case, SAP will initiate the locks that might temporarily restrict access. An SAP administrator has the ability to release this lock.
BASIS administration is also important for the following:
Maintenance
This includes reviewing system logs and records, identifying errors and fixing them. All this is done to make sure that your system is stable.
System tasks
BASIS administrators have the responsibility of planning and maintaining your system upgrades. Migrations are also handled. The admins take care of the transport management and test the software updates. This is done to ensure compatibility with the SAP systems. They also check whether the updates are installed in the correct sequence.
Planning and scheduling
BASIS administration deals with scheduling the various system jobs. This is because many jobs run in your system background and consume resources. So, these resources need to be properly scheduled. It is important for keeping the system performance unaffected.
Moreover, the BASIS admins have to make the necessary adjustments to the SAP system to meet user’s needs.
SAP Basis consultant's responsibilities
A SAP BASIS consultant runs a SAP landscape. He or she must have a strong technical background. Knowledge in subjects such as UNIX, LINUX, Windows, MySQL, Oracle and Java is desirable. Strong hardware and networking skills are also required. A consultant must have the ability to analyse problems. He or she must have communication skills to act according to customer demands.
The different roles and responsibilities of a SAP BASIS consultant are as follows:
- Monitoring system tasks and performance
- Installation, configuration and maintenance of SAP systems
- Database operations such as backup, schedule, maintenance and restoration
- Handling and maintaining SAP licenses
- Monitoring servers, background jobs scheduling and job deletions
- Creation of user profiles, providing them roles, locking/ unlocking these roles
- Maintenance of operation and profile modes
- Installation of R/3, Solution manager, Netweaver and Netweaver components
- Installing system upgrades, add-ons and support patches
- Initiating and halting the R/ 3 system
- Spooling and printing
- SAP R/ 3 router installation
- Operating, implementing and removing errors from SNOTE
Requirements for SAP BASIS
The primary objective or requirement of SAP BASIS is to keep the SAP systems running smoothly, securely and to ensure their stability. Both production and non-production environments are covered by Requirements for SAP BASIS. Performance analysis, installation of patches, upgrades and modifying parameters are all covered. Requirements also focus on troubleshooting and monitoring the systems regularly.
For all these day-to-day activities, a dedicated SAP Basis team is required.
Here are some reasons why such a team will be beneficial for any business:
Cost and time efficiency
Suppose you are facing problems while SAP Basis administration. The first reasonable step is to call the IT staff to handle these issues. But they might have other tasks and handling SAP Basis might be problematic.
This will be time-consuming and the operational costs will also be high. As these SAP systems need attention all day, a dedicated team will be very useful.
Alternatively, you can also outsource the SAP Basis work to a professional team. A dedicated team or an outsourced team will be economical.
Dealing with complex problems easily
Your company may have inexperienced IT staff or junior SAP Basis employees. They will not be able to handle complicated SAP Basis complications. Even if they do, it takes a lot of time to fix. A dedicated team has certified and experienced professionals can handle SAP errors.
This way you can avoid mistakes that might affect system performance. The ecosystem of your enterprise may be complicated. In that case, a professional team will be beneficial for your company.
Meeting customer requirements
A dedicated and professional team of SAP Basis admins are better equipped at understanding the business requirements. They are able to communicate with other members of the IT team, managers and customers. So, all the intended customer services and support are delivered efficiently.
SAP Basis and Upgrades
When a SAP system in undergoing migration and upgrades, the SAP Basis professionals take the lead. This is because while migrating the business data, the former system also needs to be running. During the installation and configuration, the old system will continue generating business data. This data has to be migrated too. So, SAP Basis professionals will set up the entire SAP landscape with ease.
Before going for an upgrade, you have to plan it carefully. This is because the upgrade process may get complex and time-taking. Your aim must be to reduce the downtime and make it as effective as possible.
Some of the important concepts that you must be familiar with for SAP Basis upgrades are:
Software Update Manager (SUM)
This is a tool that is used for system maintenance, releasing upgrades and database migration. You can install SAP enhancement packages and convert the system to SAP S/4HANA. It comes with a Software Logistics Toolset 1.0. Patches are released for providing the latest features and bug fixes.
Upgrade guides
The Master Upgrade Guide is another important document. It has all the required specifications for upgrading your SAP system. You must read it for starting the upgrade as per your product version.
SAP Notes
The update of your system will require additional information. This might not be present in the upgrade guides. You will find this information within a range of SAP Notes. It is present in the SAP Support Portal. Before starting the process of upgrading the system, access the following documentation:
- The SAP Note for your database
- Software Logistics Toolset
- SAP Notes for DMO, if you are using the option of Database Migration
- To get the best results, use the latest SAP Notes. They are updated frequently.
We now have a basic understanding of SAP Basis. Let us compare it with another important software - SAP HANA.
SAP BASIS vs. SAP HANA
SAP Basis is used for holding the SAP landscape and system together. SAP HANA is a relational database management system used developed by SAP. Administration of SAP Hana will require a specific skill set. This can be acquired from SAP Basis administration. However, both are entirely different technologies.
The main difference lies in their administration.
Role of SAP Basis administrator
A SAP Basis admin makes sure that all the SAP applications and components are able to interact properly with each other. The admin ensures that the enterprise cloud, SAS applications and databases. They monitor the system constantly and prevent system errors. They install upgrades and patches. A SAP Basis admin ensures that the backend processing or end-user performance are not affected.
Role of SAP HANA administrator
The SAP HANA admin performs all the administrative tasks of HANA. These include implementation, licensing, system migration and hosting. These admins also have data modelling skills and can also handle nearline storage.
Conclusion
If you want to use SAP technology to enhance the quality of your business, you have to form a team comprising of skilled SAP employees. The SAP Basis admins and the SAP Hana admins need to work together for the betterment of your business. As per your business requirements and goals, you have to take the steps.
Besides having a dedicated team for BASIS and HANA, you can also use SAP Solution Manager. The SAP Solution Manager is a product offered by SAP that helps to increase your team’s efficiency.
Tutorials
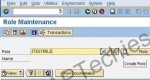 PFCG SAP Roles and Authorizations Maintenance
PFCG - ROLE MAINTENANCETo manage roles and authorization data, we can use the role maintenance. The Profile Generator is the tool for role maintenance which creates authorization data based on selecte ... Outgoing Email Configuration Step By Step
SMTP Configuration Guide Step By StepThe purpose of this tutorial is to explain the steps to activities involved in setting up the Mails from SAP. The steps are common across SAP R/3 as well as SAP ne ...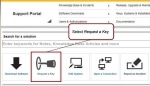 SAP License Key Installation Step by Step Procedure
How to install License Key?You want to install the license key you received from SAPThere are three different license key installation processes. The correct process for you depends on which SAP softw ...- SAP Installation Hardware Requirement for SAP 4.7, ECC5, ECC6 IDES Non IDES
SAP Installation Hardware/System RequirementsSAP 4.7 IDESHDD: 80 GBProcessor: PVI and aboveRAM: 512 MBSAP 4.7 NON IDESHDD: 80 GBProcessor: PVI and aboveRAM: 512 MBSAP ECC5 IDESHDD: 150 GBProcessor: PV ... 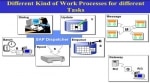 Work Process Types in SAP
What is the Work Process? Work processes I are important components of the SAP ABAP application server that are used to execute the individual dialog steps of ABAP application programs. St ...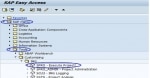 SPRO Meaning and Use in SAP
What is SAP SPRO SPRO stands for SAP PROJECT REFERENCE OBJECT. SPRO is the first transaction code when we log in to SAP. It is the transaction for IMPLEMENTATION GUIDE for most of the S ...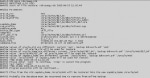 Homogeneous System Copy using Online/Offline Database Backup
Homogeneous System Copy using Online/Offline Database BackupReasons for Copying a SAP SystemSAP recommends that you make a system copy in order to build a test, demo, training or standby system (Oracl ...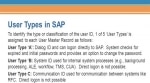 User Types in SAP
What is a User Type? In SAP, User Type defines the categories of users like system administrators or operators. This classification system goes beyond just license types. User types determ ... Create Authorization Group and Assign Table
How to Create Authorization Group Go to SE54 give the table name and choose authorization group and then click on create/change. You can create an authorization group. Assign Table ... Enable SSO in SAP System using Kerberos Authentication
Step by step guide to enable Single Sign-On (SSO) for SAP applications in a Microsoft Active Directory environment using Kerberos authentication. This tutorial is meant to be a step by step g ... Add Entry of Host in hosts file for host name and saptranshost
For the SAP installation, you need to configure SAP Server host name and SAPTRANSHOST name. In this post, we will learn the detailed steps to do it. To explain the process of to adding HOST name an ...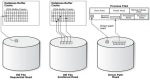 Difference between Sequential Read and Direct Read
Sequential Read vs Direct ReadIt is a very common misconception that "sequential reads in SM50 means that a full table scan is executed and an index is not used". The correct definition/conc ... sapcontrol Error: FAIL: HTTP error, HTTP/1.1 401 Unauthorized
Error while executing sapstartsrvFAIL: HTTP error, HTTP/1.1 401 UnauthorizedThe sapstartsrv provides two ways of authenticating it's requests:- HTTP Basic authentication- Trusted connectsIf you do ... SAP BASIS Certification Cost and Course Duration in India
The course begins with Introduction to SAP Basis, followed by Architecture of SAP Systems, Installing SAP Frontend, in-depth training about Administration Tasks like User Management, Transport Managem ... SAP ECC6 IDES Installation for Practice
SAP ECC6 IDES Installation The SAP IDES stands for Internet Demonstration and Evaluation System. It is a platform developed by SAP for its developers. This helps them to learn and practice the SAP ...- Print or Display PDF Based Forms within Preview
You want to activate or output a PDF form and receive an error message. You cannot print or display forms in the preview or generate or edit interactive forms, or these processes are defective.It may ...  Reset SAP* password
Consider the following situation:-You have been put on some project on which you need to apply patches to the system. but unfortunately, your previous admin forgot to give you the password for SAP* us ...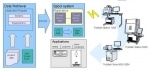 List of Supported Printers/Device Types in SAP
PRINTER DRIVERS AND DEVICE TYPES: In R/3, a distinction is made between "printer driver" and "device type". The device type consists of all the attributes defined for an output ...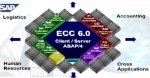 Post Installation Steps For ECC 6.0
What are the post installation steps after I have installed the Central Instance and Database instance? Initial Consistency Check SM28 1. Logon to the newly refreshed SAP system and run transacti ... SM50 tcode Kill Work Process in SAP
How to Kill a work process in SAP?Oftenly we see that work process in SAP in hung state through SM50 transaction code.Steps that will explain the process to Kill Work Process in SAP Issue:Do as follow ...